 Current location:Home > Products and Services > Oil Seal Technical Information > Key Points To Check When O-ring Leaks
 | Main Reason | Failure Mode | Reason | Countermeasures |
|---|---|---|---|
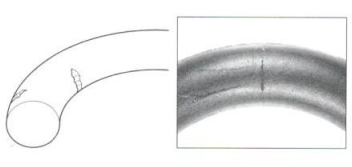
 Twist Twist |
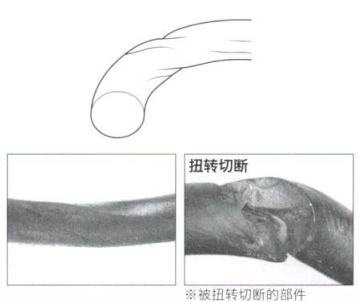 The O-ring is twisted and deformed. The O-ring is twisted and deformed.
|
① Faster movement speed. ② Eccentric movement. ③ Uneven sliding surface roughness. ④ Twisted installation. |

①Change to D-ring, X-ring, lip seal. ②Eliminate eccentric motion. ③Improve the roughness of the sliding surface ④Pay attention to installation. (Grease application, etc.) |
| Hardening |
 Hardening, twisting, cracking, etc. Hardening, twisting, cracking, etc.
|
The operating temperature exceeds the heat resistance limit of rubber. |
Reduce the ambient temperature. Change to a material with excellent heat resistance. |
| Swelling (softening) |
 The whole body becomes soft and swollen. The whole body becomes soft and swollen.
|
①Rubber materials are not suitable for sealing objects. ②This problem may be caused by the cleaning agent remaining in the machine after cleaning with light oil, gasoline, etc. |
①Change the rubber material. ②Remove the cleaning agent. |
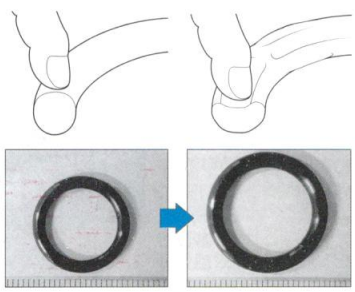
| Permanent deformation |
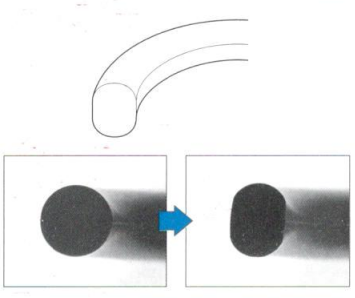 The cross-sectional shape of the O-ring becomes the same as the groove. The cross-sectional shape of the O-ring becomes the same as the groove.
|
This is more common when there is a synergistic effect of excessive compression, high temperature, and the object being sealed. |
Reselect groove dimensions and materials. Cool the seal. |
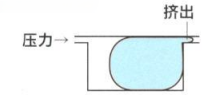
| Extrusion |
 The outer or inner surface of the O-ring is completely (or partially) cracked. The outer or inner surface of the O-ring is completely (or partially) cracked.
|
Affected by pressure, clearance and swelling above the limit.
|
Ensure proper clearance or use retaining ring. Change rubber material. |
| Bite |
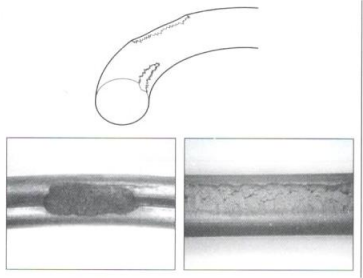 Cut off the excess part of the outer or inner surface of the O-ring, or dig out a part. Cut off the excess part of the outer or inner surface of the O-ring, or dig out a part.
|
① The chamfering of the cylindrical end face or shaft end face is insufficient and the O-ring is installed from the front. ② The O-ring groove is shallower than the specified value compared to the cross-sectional diameter of the O-ring and is barely installed. ③ During installation, the hole, threaded part, end, etc. are damaged. |
① Make appropriate chamfers. ② Modify the groove size. ③ Pay attention to the chamfers at the ends. Use a mounting fixture when installing. |
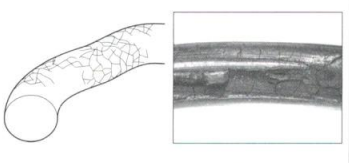
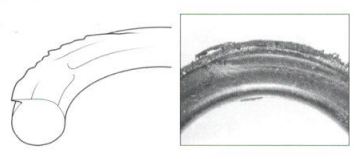
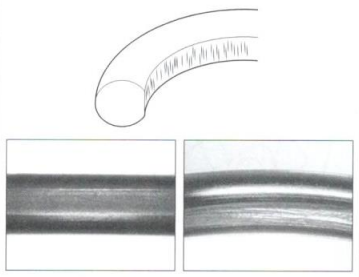
| Ozone crack |
 The entire surface of the O-ring has cracks like cracks. The entire surface of the O-ring has cracks like cracks.
|
Since the O-ring was placed in the air in an extended state, it was affected by ozone and cracks appeared on the surface. |
Do not place in the air in the stretched state. Apply grease or oil to the surface of the O-ring to prevent it from coming into direct contact with the air. |
| Scars |
 The outer or inner surface of the O-ring is scratched. The outer or inner surface of the O-ring is scratched.
|
When installing the O-ring, the threads etc. will scratch the inner (outer) surface of the O-ring. |
Use a protective clamp during installation to prevent threads from directly contacting the O-ring. |
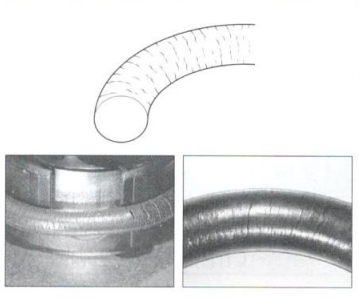
| Wear |
 The O-ring contact part is worn. The O-ring contact part is worn.
|
① When the surface roughness of the surface in contact with the O-ring is too rough, wear occurs due to pressure fluctuations. ② Insufficient lubrication. ③ Foreign matter such as dust and metal powder enters. |
① Make the roughness of the corresponding surface in contact with the O-ring meet the requirements. ② Improve lubrication. ③ Remove foreign matter and use a filter or dust ring. |
 Download
 Contact